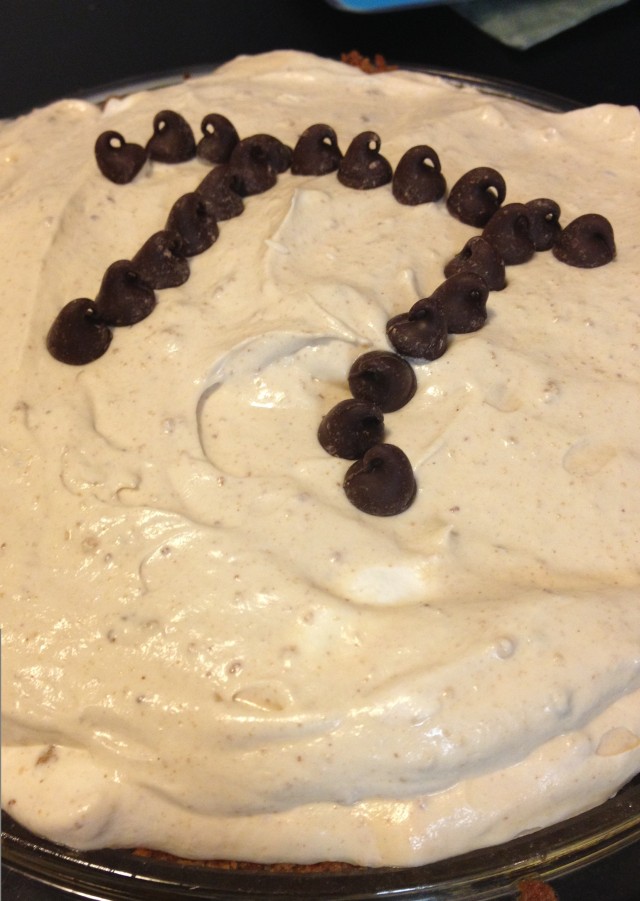
My Pi Day Pie

Please excuse my mini hiatus. I tend to take the month off to celebrate my birthday. Yes, the whole month. My grandma taught me that 🙂 I’ve entered a new chapter of life (my thirties!) and am fully rejuvenated thanks to a spa day at the Four Seasons that I gifted myself. So, despite the 30°F temps here in Chicagoland, it’s time to come out of hibernation.

I know, Pi Day was  12 days ago, but I wanted to share my nerdy tradition with you. If you’re not familiar with Pi Day, it is exactly what you’d expect it to be: a celebration of the mathematical constant better known as pi (Ď€). Even though PIE Day is January 23rd, I still find it  fun to bake a pie for PI Day and give a little birthday shout out to my man Albert Einstein. Last year I made a peanut butter and jelly pie for my coworkers. It turned out…OK…but I didn’t use any sort of recipe so it didn’t turn out quite right. It was too soft. This year, keeping with the peanut butter idea, I made a peanut butter pie with peanut butter chocolate chip cookies.

About a week before Pi Day, I made peanut butter chocolate chip cookies. They were a little crispier than we like, and my husband happened to comment that they’d make a good pie crust. And just like that, my Pi Day pie idea was born. It turned out great and I decided not to bring it to work – I just shared it with my boys at home.

 Pi_pie

Peanut Butter Pie with Peanut Butter Chocolate Chip Crust

Ingredients:
For the crust:
1-1/2 cups crushed peanut butter chocolate chip cookies
4T. butter, melted
1/2 cup chocolate chips

For the filling:
4 oz. cream cheese, softened
1 cup confectioners sugar
1/2 cup creamy peanut butter
1/2 cup milk
1 container (8 ounce) of Cool Whip (I used reduced fat)
1/2 cup chocolate chips for decoration

Directions:

  1. Preheat the oven to 375°F.
  2. In a small bowl, mix together the crushed peanut butter chocolate chip cookies and the melted butter.
  3. Evenly press the mixture into a 9″ pie plate and top with chocolate chips.
  4. Bake the pie crust for about 10 minutes. When you take it out of the oven, spread the melted chocolate chips around to form a thin layer over the entire crust.
  5. In a large mixing bowl, whip cream cheese until soft and fluffy.
  6. Beat in sugar and peanut butter.
  7. Slowly pour in milk, beating mixture until smooth
  8. Fold whipped topping into mixture. 
  9. Pour mixture into crust and decorate with chocolate chips if you’d like.
  10. Freeze until firm.
  11. Store any leftovers in freezer.

Mincemeat Pie

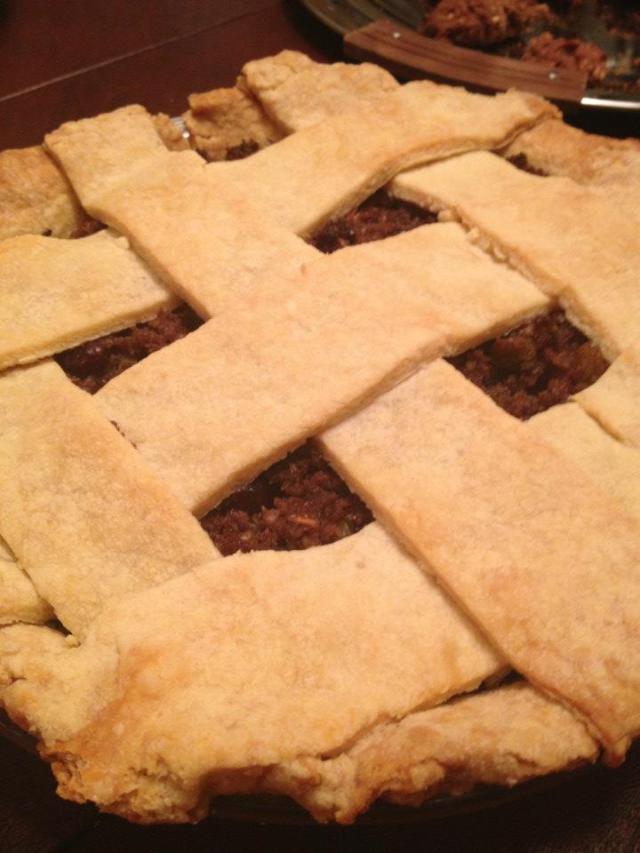
I made my very first mincemeat pie over Thanksgiving. I had heard of it before, but never seen, tried, or attempted to make one on my own. One of our Thanksgiving celebrations was with my husband’s dad, stepmom, and grandma. I always make his dad a pecan pie when I see him, but this year I decided to make them each a pie, so I made a mincemeat pie for his stepmom and a chocolate/French silk pie for Grandma Z.

I found out later that they sell mincemeat pie filling in a jar. Really?! Nobody told me. It’s not in true Kim-fashion anyway to use a jarred mix of sorts. So, per usual, I scoured the interwebs in search of what sounded like the best recipe. I ended up adapting this one from Allrecipes.com for the filling. This ended up to be really tasty! I had no idea what to expect, but it was so flavorful and received rave reviews from even the toughest critics.

I should note that this is a sweet pie, not savory as you might expect. It’s definitely for dessert, but I may or may not have eaten the leftovers for lunch. Hey, it has fruit, meat, and carbs in it, so it’s a perfectly suitable meal if you ask me… Enjoy!

Mincemeat Pie

Mincemeat Pie

Ingredients:

For the Filling:

  • 1-1/4 pounds lean ground beef
  • 4-1/2 cups apples – peeled, cored and diced
  • 2-1/4 cups dried fruit (I used dried cherries and cranberries)
  • 1/2 cup and brandy
  • 1/4 cup pickle juice
  • 1 teaspoon ground cinnamon
  • 1 teaspoon ground allspice
  • 1 teaspoon ground nutmeg
  • 1-1/4 cups and 1 tablespoon white sugar
  • orange zest to taste (I used the zest of half a softball sized orange)

For the Crust:

  • 2 cups all-purpose flour
  • 1 teaspoon salt
  • 1 cup shortening
  • 1/2 cup water

Directions:

Make the dough for the crusts:
1. In a large bowl, combine flour and salt. Cut in shortening until mixture resembles coarse crumbs. Stir in water until mixture forms a ball. Divide dough in half, and shape into balls. Wrap in plastic, and refrigerate for 4 hours or overnight.

Make the filling:
2. Make the filling. In a large skillet over medium heat, cook the ground beef thoroughly, being sure not to over-brown it.

3. Place chopped apples and the cooked ground beef in a food processor and pulse until the mixture is made up of pea sized chunks.

4. In a non-reactive skillet combine the apple and ground beef mixture with the dried fruit, half of the brandy, the pickle juice, ground cinnamon, ground allspice, ground nutmeg and the white sugar. Simmer for 30 minutes.

5. Cool filling to lukewarm and store in covered container in the refrigerator for a week, or freeze. Continue to add brandy to the filling and mix it up every few days.

Assemble your pie:
6. Preheat your oven to 325°F

7. Roll out the dough for the two crusts on a floured surface, making sure not to overwork it.

8. Put one crust in the pie pan. Pour in the filling. Top with the second crust. (I chose to do a lattice top for mine, but you could just cover it and put a few slits in the top if you prefer.)

9. Bake for 50-60 minutes. Cool and serve!

Old Fashioned Apple Slab

I know, I had no idea what an apple slab was, either.

One of my favorite email subscriptions has to be to King Arthur Flour. I’m obsessed with them – their ingredients, products, recipes, you name it. It is also one of the few paper catalogs that I actually read (and look forward to receiving) every single month.

When I was trying to decide what to make for Thanksgiving dessert, I immediately thought of that KAF email sitting in my inbox. My husband loves all things apple, and I had already decided to make a Pumpkin Roll, so this Old Fashioned Apple Slab recipe was a clear winner. I had all the ingredients except for the buttermilk powder. I did, however, have buttermilk, so I used about 2 Tablespoons of buttermilk in the crust, and cut down on the amount of water I used.

The result was a better version of the best apple pie you’ve ever had. Essentially, an apple slab is an apple pie baked in a 9×13 pan, with a glaze drizzled on top. I don’t know how it can be so much better than an apple pie, but it is. You have to try this for yourself – you can thank me later.

old fashioned apple slab

Oatmeal Raisin Cookies (with browned butter)

I discovered browned butter last year when I made these Pumpkin Cookies with Browned Butter Icing, and I have to say that it makes EVERYTHING better. That’s a fact.

After perusing the ‘net (do people still call it that?) for something sweet to bring over to a friend’s house for a casual dinner Friday night, I decided to create/adapt my own. If you follow my blog at all, you might get the impression that I’m a little lazy. It’s OK. It’s true. So, I was on the hunt for a recipe that used ingredients I already had on hand. Thanks to my Twitter feed, I was introduced to this recipe for White Chocolate Cranberry Oatmeal Cookies with Browned Butter. There were only two flaws with this recipe: 1) I did not have dried cranberries (no big deal; I had raisins) and 2) My husband does not like white chocolate (another non-issue….easy to omit).

So alas, I modified that recipe and ended up with a really yummy oatmeal raisin cookie. I added white chocolate chips to about 1/3 of the batch. I keep taste testing each version (with and without white chocolate chips) and can’t figure out which I like better 🙂 The browned butter really gives these cookies a nice, nutty flavor. I might add chopped pecans if I make them again. Give these a shot if you’re up for straying from your go-to oatmeal cookie recipe!

Oatmeal Raisin Cookies with Browned Butter

Ingredients:
2 cups flour
1 t. baking powder
1/2 t. baking soda
1 t. salt
1 t. cinnamon
16 T. butter (2 sticks)
1 c. brown sugar, firmly packed
1/2 c. white sugar
2 eggs
2 t. vanilla
2 c. oats
1 c. raisins
1 c. white chocolate chips (optional)
1 c. chopped nuts (optional)

Directions:

  1. Preheat the oven to 375°F.
  2. In a medium mixing bowl combine the flour, baking powder, baking soda, salt, and cinnamon.  Mix well and set aside.
  3. Put the raisins in a small bowl of warm/hot water (enough to cover all the raisins) and set aside.
  4. In a large mixing bowl combine the brown sugar and granulated sugar.  Set aside.
  5. Add the butter to a medium skillet over medium heat.  Allow the butter to foam.  Once the foam has cleared gently stir the butter with a wooden spoon until it begins to brown.  Continue stirring gently until the butter smells nutty and has browned.
  6. Remove the butter from the heat and immediately pour into the mixing bowl with the sugars.  Mix well to combine.
  7. Add the eggs to the sugar mixture one at a time, beating after each addition.
  8. Stir in the vanilla.
  9. Slowly add the flour mixture to the sugar mixture stirring well to combine.
  10. Drain the raisins that have been soaking in warm water.
  11. Stir in the oats, raisins, white chocolate chips and nuts, taking care to evenly distribute them throughout the cookie dough.
  12. Drop tablespoons of dough onto the cookie sheets 3 inches apart.
  13. Bake for 8-10 minutes or until the edges are just browned.
  14. Remove from oven and allow to cool for 2-3 minutes before transferring to a wire rack to cool completely.

Caramel Pumpkin Cheesecake Dip

Have I mentioned how much I love fall baking?! One of my fall favorites is definitely apples. I’m normally a purist and eat my apples just plain, but this lovely recipe landed in my inbox earlier this month and it inspired me to make some kind of dip for apples. I wanted to use up some canned pumpkin I had, so I decided to use that recipe as inspiration and start experimenting in the kitchen.  I admittedly did not write down what I did while I made this, but because it turned out so yummy, I attempted to use the old noggin to try to remember what I did. To the best of my memory, this is what I did:


Caramel Pumpkin Cheesecake Dip

Ingredients:
8 ounces cream cheese, at room temperature
½ cup pumpkin
¾ cup powdered sugar
½ teaspoon vanilla extract
¼ cup caramel sauce
Granny Smith apples, cored and sliced

Directions:

  1. Whisk (or beat with an electric mixer) the cream cheese and pumpkin together.
  2. Add the powdered sugar a little bit at a time, incorporating each addition before adding more.
  3. Stir in the vanilla extract and caramel sauce.
  4. Refrigerate the dip for a couple hours.
  5. Serve with cored and sliced Granny Smith apples.

Fall Baking To Do List

Is anyone else obsessed with Pinterest? OK, good.

With fall in the air (never mind the few days we had that were 90+ degrees), I can’t help but think of fall baking. Its my favorite! Apples, pumpkin, pies, cookies…it’s my favorite time of year when it comes to everything, especially baking.

I love Pinterest for the fact that you can find such great ideas or recipes in no time. However, I’m often a victim of information overload, especially when it comes to things to bake. There are so many recipes I want to try and I feel like there is just so little time to get to all! Here are just a few things I plan on making in the coming months. What’s on your baking To Do list?

Slow Cooker Mocha Pudding

Whiskey, Marshmallow, Caramel and Bacon Bark

Black Velvet Halloween Trifle

Cinnamon Roll Pie Crust (but probably with an Apple Pie)

Curious as to what else I’ve pinned to my boards? You can see here and follow any boards you like!

Cinnamon Sugar Biscotti

Biscotti is one of those things I always thought was too difficult to make. My husband’s stepfather is Italian and told me it’s actually quite easy. So,  I attempted it a couple of years ago, and confirmed that he was correct – it really isn’t that difficult at all. The first biscotti I ever made was a simple almond biscotti. I’m glad I started with that one as it gave me the confidence to continue trying to make other varieties. Next was a peppermint biscotti, dipped in chocolate and rolled in crushed candy canes (what an awesome Christmas treat!).

I was talking to some coworkers about how easy biscotti is to make and sure enough, I got home the other night and decided I needed to make some. I settled on cinnamon sugar – one of my favorite flavor combinations.

I consulted my usual recipe sources and decided to adapt this one from the trusty Allrecipes. With a few small changes, I think this recipe turned out perfectly! The biscotti were crisp on the outside and just a bit softer on the inside. Excellent!

What’s your favorite kind of biscotti?

Cinnamon Sugar Biscotti

Ingredients

  • 2 cups all-purpose flour
  • 1 1/2 teaspoons ground cinnamon
  • 1 teaspoon baking powder
  • 1/4 teaspoon salt
  • 2/3 cup white sugar
  • 6 tablespoons butter
  • 1 egg
  • 1 egg yolk
  • 1 teaspoon vanilla extract
  • 1 egg white
  • 3 tablespoons white sugar
  • 1 tablespoon ground cinnamon

Directions

  1. Preheat oven to 325° F
  2. Line baking sheets with parchment paper
  3. Sift together the flour, 1 1/2 teaspoon cinnamon, baking powder and salt – set aside.
  4. In a medium bowl, cream together the 2/3 cup sugar and butter. Beat in 1 egg, egg yolk and vanilla.
  5. Gradually add in the dry ingredients.
  6. Divide the dough into two equal parts and roll each piece into a log about 9 inches long and 1 1/2 inches wide.
  7. Place logs on the prepared baking sheet and flatten slightly. Brush with egg white.
  8. Bake for 30 minutes in the preheated oven, until golden and firm to the touch. Cool for 15 minutes.
  9. On a cutting board, slice each log crosswise at a diagonal into 1/2 inch slices, using a serrated knife.
  10. Place back on the baking sheet, cut side down, and sprinkle with a mixture of the remaining cinnamon and sugar. Return to the oven for 10 minutes.
  11. Flip your biscotti and sprinkle the other side with the cinnamon sugar mixture. Return to the oven for 10 more minutes.
  12. Cool on wire racks, and store in an airtight container.

Ice Cream Scones

I started a new baking project. My husband and I ended up with his grandmother’s church cookbook after she passed away. After a bit of research, we determined this cookbook dates back to the early 1970’s and was a product of Trinity Lutheran Church in Enderlin, North Dakota. After flipping through the pages, I decided there were too many recipes that looked awesome and too many ingredients I haven’t used before. So, my new project involves me baking/cooking my way through this cookbook. You can follow my journey here.

First up, ice cream scones. The original recipe was for ice cream muffins, but really, they’re quite similar. You can find the recipe and read about this adventure here. This was one of the quickest, easiest things I’ve ever made, so give it a shot!

If interested, follow my North Dakota Church Cookbook Project.

Orange Cookies with Orange Glaze

Happy Memorial Day weekend to all my friends in the US! This weekend is full of family, friends and BBQ’s for many. I always offer to bring the sweet treat to any gathering I attend, and this year, I came across the perfect summertime recipe. Since it’s the unofficial start of summer, how could I pass this up?

Brown Eyed Baker had this recipe for these orange cookies with orange glaze just over a month ago. I have made them four times since her blog posting and each time I’ve gotten rave reviews. One coworker told me they were the best cookies he’d ever had. Another coworker requested these for his birthday and these flew off the table at a bake sale. So, as you can see, this is a must-try recipe.

Jump on over to Brown Eyed Baker for the recipe I didn’t see a need to adapt it all. Enjoy this recipe and your holiday weekend!

Mama Wants a New Apron

Mother’s Day is right around the corner, and if you’re anything like me, you’re a mom who likes to have a constant flow of treats in the house. (Nevermind that my little man is still shy of a year and not eating sweets yet…)

These days I’m usually multitasking while I’m baking: trying to feed Noah or keep him out of most drawers he shouldn’t be in. My level of multitasking is directly correlated to the amount of flour and other baking “things” that end up all over my clothes. So, I’m thinking a new apron is in order.

I have one from Anthropologie that I LOVE (thanks to my sister for the awesome gift), but it’s not a bib apron and I’m finding out that the bib aspect is essential! So, thank you Mamapedia for introducing today’s fabulous deal from Aprons Central in time for Mother’s Day!